Tag: Computer Training

When going to a website you have the address for, do you just type it in the Google or Yahoo search box?   You are creating more steps and possible confusion for yourself if you are not using the address bar when you have the address.

Address Bar versus Google Search


The address bar is at the top of the window. When you have the address of the website you’re going to, say for example www.Macys.com, go right to it by typing the address in the address bar. (Finish by pressing [Enter].)

You can use a Google or Yahoo search box to get there as well, but it is a SEARCH box that will show you search results first. You will have to locate the link you want in a cluttered screen full of search results.

A Google or Yahoo search box is best used for searching topics – when you don’t know where you need to go to find the information.  For example, say you want to find out about the Academy Awards.  You don’t have a specific address to go to – just a topic you want to search and explore.

In this Google search of Academy Awards 2012, Google finds 27,800,000 “hits” …

Top of a Google Search result indicates the number of results


The blue underlined text is a link to that site.

The green text is the address of the site. It can help you decide if it’s one you want to view.

Want to check several of the results without losing the search page?  Right-click on the link > Open in New Window. The Search results remain open in the previous window.

Want to find an address or a property?  Simply type an address and city in the search box.

Let us know some of your favorite search tips.

Tags: , , ,

A very common scenario in Excel is creating spreadsheets that report numbers for specific time periods. For example, weekly, monthly, quarterly, or annual reports.  This means you will continually be re-creating the same spreadsheet going forward in time – other than the variance in reported data.

You don’t want to start from scratch. Make quick work of your next report – duplicate the sheet, then edit the details. 

Some of you might be asking “Does she mean copy-and-paste?”  NO!  Though it can be accomplished by copying the info from the previous spreadsheet to a new blank sheet, it will take more work than the duplication method because there are several things that do not come over with the copy-and-paste, including:

  • Widened columns.
  • Changed row heights.
  • Print settings, including headers and footers.

To duplicate a sheet:

  1. Drag the sheet tab to the right while holding the CTRL key down.
  2. When you see a little black triangle appearing on the right side of the sheet tab, release your mouse before releasing the CTRL key.  The new worksheet will be named the same with a (2) after it. Example: A duplicated March sheet will be March (2). 
  3. Now edit the details of the duplicate sheet.  Change the sheet name, edit time period labels, input your new data.

Quick and easy you are done with your report and leaving your office early! (Until the boss decides they need to give you more work 🙂

Tags: , ,

One of QuickBooks’ useful reports is the Open Invoice report (Reports > Customers & Receivables > Open Invoices) to help you stay on top of money owed to you.  The report lists customer unpaid invoices.  Have you ever used this report and found a customer listed with a zero balance?  Why is it showing up on the Open Invoice report?  (See illustration below). 

QuickBooks Open Invoice Report with Zero Balance

QuickBooks Open Invoice with Zero Balance

 When entering a customer payment, the default in QuickBooks (in Edit > Preferences > Sales & Customers) is to Automatically apply payments. This means that when you enter the upper part of the payment window, QuickBooks will automatically checkmark a matching or older payment due in the payment window.

QuickBooks Preference: Automatically Apply Payment

If you turn off this feature, QuickBooks does not enter a checkmark against open invoices. The user must do it.

Why would someone want to turn that off?  QuickBooks sometimes applies the payment in the wrong place. It “guesses” which invoice to apply the current payment to. If the user is not paying attention, the payment can get applied to the wrong open invoice.  This is potentially a problem for businesses that have multiple open invoices for any one customer.

By removing the checkmark for “Automatically apply payments,” the user must proactively place a checkmark next to the invoice the payment is intended for.

Occasionally the user may forget to checkmark the invoice being paid by the payment. In a simple scenario of one payment paying one single invoice, the result will be the payment is noted for the customer, but is not specifically applied to an invoice. Resulting in a zero balance for the customer, but the invoice is still considered “open.”

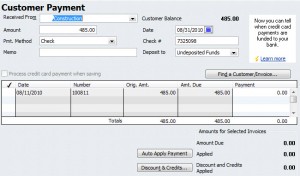
The illustration below shows a Payment that was entered, but notice there is no checkmark in the first column, which would apply it to that invoice. The customer gets “credited” for the payment, but the invoice is not cleared. 

QuickBooks Customer Payment Window

Place a Checkmark in the First Column to Apply to Invoice

Fixing this is easy. Simply open the payment, and place the checkmark next to the invoice it pays in the lower part of the payment window. Now when you run Open Invoices, the invoice should no longer be in the report.

Tags: , ,

Do you get tired of re-typing the same paragraphs or specially formatted text in your documents on a regular basis?  Or maybe you have tried to solve that issue by opening previous documents to copy and paste text to your new document.  No need to do that when you can “memorize” text passages with Word 2007/2010 Quick Parts. 

Quick Parts allows you to create reusable formatted text, even tables, which you can insert instantly without recreating every time you need it. 

A good example is the closing paragraph and signature in a letter. If your letter closing and signature is always the same, don’t re-type it or copy-and-paste it each time. Create and use it as a Quick Part!

Here is how you create your custom Quick Part.  In this example I will do a closing paragraph and signature area.  You only have to do this once, unless it changes.

  1. Create the text in a Word document as you want it to appear in your documents. (Or you can open one that already exists). In the following example of a letter closing I have even used a picture logo.Microsoft Word Quick Parts Example
  2. 2. Select the full passage you want included. In my example above, I will select from “We look forward… down to (and including) my website address.

3.  Insert > Quick Parts > Save Selection to Quick Part Gallery.

4.  Word will suggest a name for the Quick Part, but you can edit the name.

5.  Word will save it in the General category of Quick Parts. However, you can create a new category of Quick Parts by clicking on Create New Category from the drop-down. Category examples:  LetterClose, or Disclaimers

To use your Quick Part in future documents: 

  1. Click at the spot where you want to insert the text.
  2. Insert Ribbon > Quick Parts > select your Quick Part from the list.

You should now see your entire closing and signature line! Every time you need to use the text – that’s all you have to do.  Saves a lot of typing! 

Another component of Quick Parts is the Building Blocks Organizer (I’ll call it the BBO).  The BBO includes a list of built-in “document parts” you can use for instantly professional looking documents.  Examples of document parts include cover pages, headers/footers, tables, text boxes, and more.  A great way to check out how you might use the BBO is to explore it, try some out.  Insert > Quick Parts > Building Blocks Organizer…

There are so many cool features to help make your work fast and easy in Microsoft Word. Stay tuned for more time-saver tips!

Like knowing the shortcuts?  Our Microsoft Word Shortcuts “Cheat Sheet” is now available. Click here  for more information.

Getting good training is the single most important thing you can do increase your computer productivity.  That’s where we can help!  Sign up for our email list on our home page and give us a call today.

Tags: , , , , , , , ,

Stop Unwanted Startup Windows

Have you ever had a new window begin appearing every time you start your computer and find yourself asking “Where did that come from?”

This can occur after you have installed a new program, or when your computer has installed a Windows update.

In this illustration, a Windows Live Messenger sign-in screen began to appear every time I started my computer. This occurred after a Windows Update.

DesktopWithPopup

True, I could just close the window each time, but there is no need to do that if I remove it from my startup configuration. I could also close down the icon on my Task Bar by right-clicking and selecting [Exit]. But the program will appear again next time I start the computer.

SYSTRAY
The visual indicator of the programs opening and running in the background on your computer is an area called the Systray, which is where your computer clock is (lower-right corner of your screen).

Several of these programs need to be running, such as the sound, your computer network, your anti-virus software, and perhaps some programs that you use regularly. But the more icons you have in this area:

1. The longer your computer start-up takes.
2. More memory resources are being used by your computer for those programs running in the background.

You have the option of removing these programs from the Start-Up without removing them from your computer.

In this demonstration, I’m on a Windows Vista computer, though the process works similarly with Windows 7.

1.  Click the Start button (lowerleft) and type “run.”  This will find a program called RUN. Click on that.

2.  Type msconfig, press [Enter].

3.  In Windows Vista, you may be asked permission to continue. Click [Continue].

4.  In the System Configuration dialog box, click the Startup tab.
      You will see a list of checkboxes and programs running in the background.
      The Startup Item column can be widened if it’s difficult to see the program name.

5.  Remove the checkmark from the program you want to disable from Startup.  Sometimes it can be difficult to identify which program that is. The command column can sometimes provide some clues.

In this illustration, I want to remove the checkmark from Windows Live Messenger.

StartupPrograms

You may need to restart your computer. If you are ready to restart, click that button. Otherwise, you can [Exit without restart] to continue working with your computer and restart your computer later. 

After going through these steps, the Windows Live Messenger window no longer opens automatically on my computer. However, the program is still on my computer, so I can open it when I need it.

Tags: ,

Where should you start when you want to learn Microsoft Office?

As I mentioned in an earlier post to beginners, having clear goals is the best place to start. You should also make sure you have basic Windows skills, which includes knowing how to navigate your computer, adjust settings and preferences, get to the internet, create folders, open programs, and manipulate windows.

 Microsoft Office includes a group of programs for tasking. The core programs include:

Word – Word processing, for creating letters, memos, reports, and book writing.
Excel – For creating spreadsheets, tracking data, mailing lists and other simple data lists, and graphs.
PowerPoint-For creating and displaying presentations, flyers, and handouts. You can also create computer photo albums.
Outlook-For email, calendar, contacts, and task lists.

Other programs may be included, depending on which version of Microsoft Office you have.

In general, the best place to start is with Microsoft Word, since so much of what you learn will carry over to all other programs, as well as on the internet. Many of the tips and tricks you learn in Micosoft Word will also help improve your productivity (make you speedy) and keyboarding.

From there, evaluate what you need. For example, if you are job hunting, watch for what the job posts are asking for.  Outlook is often a good next step, since Outlook is the #1 email and schedule program used by businesses.

Excel is a versatile and popular program, and many jobs require at least a basic knowledge of Excel.  PowerPoint may not be required in many jobs, but it’s one of the easier and fun programs to learn.  In an upcoming post I’ll describe and compare learning Word versus learning PowerPoint.  Stay tuned!

Tags: ,

At Computer Tutor we have a passion for helping people use their computer to get stuff done, to keep in touch with people, and to learn or be entertained. Even for beginners.

Start by identifying your goals. Be more specific than “I need to
learn how to use a computer.” I hear this a lot, and my next question is always “why?” Are you trying to get a job? Is some one telling you to get computer training? Do you want to be able to email family and friends? Shop online? Sell on eBay? Run a business? Maybe you just need to feel less frustrated when using your computer.

Here is what we suggest:

1. Have specific training goals.
2. Use your time wisely by focusing on those immediate goals.
3. Take it a day at a time – and practice practice practice!

You could spend years learning about computers, but you don’t have
to. It is an ongoing process, and you only need to know what you need to know. I have been teaching Windows, Email, Microsoft Office, and QuickBooks for many years, and I am still learning new stuff every day myself.

So don’t stress if it seems like a lot to learn – have fun!

If you are in Southern California and would like personalized training, click on the link on the right side of this page to the Computer Tutor Schedule of Classes.

Tags: , ,
Back to top