Everyone makes data entry errors. You need to correct errors quickly so you can move on with completing your work. In Excel, here are some ways to do that.

If the error just occurred:

1. [ESC] key on the keyboard. If you are still typing and have not hit [Enter] yet, press [ESC]. This cancels what you’ve begun to type in to a cell, but have not confirmed yet. (If you have already hit [Enter], see instructions below).
2. Click the Red X on the formula bar. This is the same thing as pressing [ESC]. The red X will not be available if you have already entered the data. This is only if you are still typing in the cell.
3. UNDO: If your error is recent, you can Undo. To undo:
Keyboard method – CTRL Z; (This one works in almost all programs)
Toolbar method – Undo Button (Left-facing blue arrow)
Menu method = EDIT > UNDO

If the error has already been entered, you have 2 options:

1. Click on the cell and simply re-type the correct entry. You do not have to press delete first, though that would work as well. The correction can be re-typed in the cell or on the formula bar.
2. Delete: Highlight the cells to delete data from, press [DELETE] on your keyboard.

Remember – UNDO is your best friend!

Tags: , ,

Outlook Drag-and-Drop

One of the things I love about Outlook is its drag-and-drop features. For example, creating email subfolders for categorizing emails by subject, I can drag emails I want to save in to the appropriate folder.

But I can also drag emails to my calendar. Sometimes you receive an email for something that must go on your calendar. All you have to do is drag the email from your Inbox to the Calendar icon in the Navigation Pane (left side of screen). An appointment window opens where you fill in the date and time – Save & Close. If you check your calendar you’ll see the appointment with all the details in the email included!

You can go a step further and color code your appointments. Here is an example. Let’s say I color-code all of my travel related calendar items red. I receive a flight confirmation email from my airlines, so I drag and drop the email on my calendar icon. When the appointment window opens, I set the date/time of the flight and color code it red by clicking on the Categorize drop-down button on the Outlook 2007 ribbon (click on the Categories drop-down box in Outlook 2003). Save and close.  An example is pictured below.
OutlookCalendarColorCode

Cut/Copy and Paste are computing essentials, giving you the ability to edit quickly and easily. Because it is such a basic yet important skill, many of you already know the drill. However, many of my readers are still learning the basics, so this is for those of you unsure of your Cut/Copy/Paste skills.

Difference between Cut versus Copy

CUT and paste removes text or objects from the original location to move it elsewhere.
COPY and paste leaves the original in place while you copy it to another location.

There are 5 Methods for Cut/Copy/Paste. We’ll use Microsoft Word 2007 as our program example here, but the keyboard and right-click methods can be used in any program.

1. Keyboard
2. Right-Click
3. Ribbon (toolbar)
4 “Drag ‘N Drop”
5. Quick Access Toolbar can be customized to include Cut/Copy/Paste. (Next to Office Button in upper-left corner of screen, must be customized first)

4 out of the 5 COPY or CUT actions happen in four steps. What varies is the command method.

1. Highlight the text you are copying or moving.
2. Activate COPY or CUT command
3. Place cursor where you want to place the text.
4. Issue PASTE command.

Here are the specifics for each method. Try them to see which one you prefer. Remember to highlight the text first.

1. Keyboard Method: CTRL + C to copy; CTRL + X to cut; CTRL + V to Paste

2. Right-click method: Right-click > Copy or Cut; Right-click > Paste

3. Ribbon Method – on left side of the Home Ribbon
Click Copy button or Cut button (scissors). Click at your destination, then click Paste button (clipboard button at far left of Home Ribbon).

4. Drag-and-drop: Highlight text to copy or move. To move: Point at the highlighted text, use the mouse to “drag” the highlighted area to your destination.
To copy: Hold CTRL key down while you drag

5. Quick Access Toolbar Method
Copy and Paste commands must be added to the toolbar first by clicking on the customize drop-down arrow

Some examples of places to use Cut/Copy/Paste: Email, Internet, Windows, Excel, Photo editing… and much more!

Like knowing the shortcuts?  Our Microsoft Word Shortcuts “Cheat Sheet” is now available. Click here  for more information.

Tags: , ,

As long as you are setup correctly to do so, it’s easy to print vendor 1099 tax forms from QuickBooks.  There are 4 essential steps leading up to accurate 1099s:  Setting up the vendor as a 1099 vendor (including their tax id), mapping the expense categories related to those vendor expenses, properly paying the vendor using those expense categories, then buying the 1099 tax forms (forms can be purchased from our link to Intuit Forms & Supplies on the QuickBooks training page) and printing the forms through Vendors > Print 1099s…

These are the steps for marking vendors (people or entities you buy products or services from) as 1099 eligible:

  1. From the Vendor Center, choose Edit Vendor.
  2. On the Address Info tab, make sure:
  3.  
    • The vendor’s legal name appears in the First Name, M.I., and Last Name fields.
    • The vendor’s address, city, two-letter state abbreviation, and zip code are complete.
  4. Click the Additional Info tab.
  5. Enter the vendor’s Tax ID number. If the vendor is a sole proprietor, enter the vendor’s social security number. Otherwise, enter the vendor’s nine-digit tax identification number.
  6. Select the “Vendor eligible for 1099” checkbox.
  7. Click OK to close the Vendor record.
  8. Repeat steps 2-8 for each Vendor that needs a 1099

The additional steps for completing the 1099 process will be covered in a future post.

Any Microsoft product that starts with the word “Windows” is referring to the Microsoft operating system (OS).  The Operating System is the software that makes the computer work.  It is also the “interface” between we humans – and the machine!  Without the operating system, the computer would not work.  Other operating systems (not Windows) include Mac, and Linux.

 Windows 7 is the most current Microsoft OS, and there are several versions, including Home, Business, and Ultimate. If you need a computer for business purposes, the Professional version is recommended.   

 Home Edition is not a “managed” OS, meaning it’s not typically managed by technology professionals. The Professional edition has more tools for a business in an IT-managed environment. Vista Professional is a business- and power-user oriented superset of Home Edition and includes features that may be too complex for the typical home user. One difference is security, which is vastly simplified in Home Edition.

What is Office?

Microsoft Office refers to a bundle of Microsoft computer programs used widely in business, including Word, Excel, Outlook, PowerPoint.  Not all computers come with Microsoft Office – it must be purchased and installed.  What these programs do:

  • Word – Word processing – letters, memos, reports.
  • Excel – Spreadsheets – financial data, simple data base, number crunching.
  • Outlook – Email, calendar, contacts, and organizational program.
  • PowerPoint – Presentation software – for creating overhead projection presentations, slideshows, or handouts.

By what I often hear from people or see posted online, Microsoft Word seems to be the most hated of the Microsoft Office programs, and I think I know why. In many cases, it boils down to a lack of, or poor training.  Not that Word is perfect – no program is.  But let’s take a look at the big picture.

Word is a word processor, with features designed around formatting words on a page organized in to sentences, paragraphs, pages, and sections. So it’s used for reports, letters, memos, books, handouts, invitations, flyers, and more.  It’s all about text editing.

Because text editing occurs in almost any other program you use, including email and internet, much of what you learn carries over to everything you do on the computer. So Word is a great place to start with your training. You even learn to use the keyboard more effectively.

I’ve noticed that Word haters who never got training (or inadequate training) don’t understand that Word has four levels of formatting. Even when I started my training career, I never saw it taught this way, but after a few years of using and teaching Word myself – it occurred to me that understanding this concept tends to clear up a lot of confusion.

Word’s four levels of formatting:

Character formatting
This is usually the level that people with minimal training “get”.  The problem is there’s an assumption that everything else works the same way. This is why they may have trouble formatting their document.

Character formats apply at the text character level – letter-by-letter.  Examples :  fonts, font size, font color, bold, italics, underline. You select the text and apply the format.
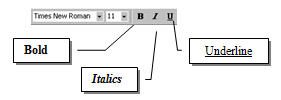
Microsoft Word Character Formats

Microsoft Word Character Formats


Paragraph formatting
Paragraph formatting applies to whole paragraphs.  Paragraph formatting is key – so it is important to understand how Word recognizes a paragraph (I’ll get to that later).  Examples of paragraph formatting include

Indents, line spacing, paragraph spacing, alignment, bullets and numbering, tabs, and heading controls.

If applying to a single paragraph, you click ANYWHERE in the paragraph to apply the paragraph format.  If applying to multiple paragraphs, you must select all of the paragraphs.

Understanding this level of formatting is HUGE.  For example, you can create any type of indent to as many paragraphs as you like when you learn how to use the ruler to work with paragraphs. Many other intermediate to advanced features that help you automate your document depend on well-defined paragraphs and text relationships.  Examples:  Styles, Table of Contents, Outlines.

Page/section/document formatting
Applies to whole pages, sections, or the entire document.. Sections can be defined in order to have multiple page layouts that would normally apply to the entire document.

Examples of page/section/document formatting:  margins, page orientation, headers and footers, page numbering, page borders, columns.

These formats will automatically apply to the entire document unless you define sections (covered in intermediate or advanced Word). When you have sections, you apply formats to sections through the appropriate dialog box (depending on the format you are applying).

 Object formatting
Objects are things you insert to your document that “float” on the page. Objects have their own formatting dialog box, which you can access by double-clicking on the object.

Examples of objects:  pictures, clipart, text boxes, arrows, AutoShapes, WordArt.

Examples of object formatting:  line or no line (around edge), color, shadow effects, size.

How Does Word Know What a Paragraph Is? 

Any place in the document you press [ENTER].

 Each time you press the [Enter] key on the keyboard, a non-printing paragraph character like this: ¶  is entered on your document, marking all text between there and the previous paragraph mark as a paragraph. In a future post, I will talk about non-printing characters.

 There is a lot more to learn about Microsoft Word, but I hope this information makes your Word learning experience go a little easier!

Our 2-sided, laminated Word Shortcuts “Cheat Sheet” is a handy card you can keep by your computer as a quick reference for shortcuts in Word.  Click the following link to order your copy:

http://www.computertutornews.com/store/

Melissa Guzzetta
The Computer Tutor
Computer Training and more 


Tags: ,

QuickBooks-Set Default Invoice Date

Are you having trouble with QuickBooks when creating a new invoice that it seems to have a random date instead of today’s date?  You can set QB to default to today’s date when opening a new invoice form.

Go to Edit > Preferences
Click on the General category > My Preferences tab
Near the bottom, under Default Date to Use for New Transactions click “Use today’s date as default.”

Now you should be able to open a new invoice that is automatically dated with today’s date.

See you in class!

Melissa, The Computer Tutor
Computer Training and more

Tags: , ,

Hide Slides in PowerPoint

Why hide a slide? 

Slide show presentations can be used over and over again, with minor edits to customize as needed.  There may be times when a slide is not necessary or appropriate for a particular presentation, but you don’t want to delete the slide as you may need it for a future presentation. Hiding selected slides temporarily suppresses the slide during the presentation, skipping over it to the next.  But don’t worry, you can still see the slide while editing the presentation, and it’s easy to turn on/off.  To hide a slide: 

  1. Right-click on the slide to be hidden > Hide Slide.
  2. To Unhide: right-click > Hide Slide. (It’s an on/off switch).

 In PowerPoint 2007, there is also a Hide Slide button on the Slide Show ribbon. When a slide is set to hidden: 

  1. The slide is still visible in the Slide Sorter and Normal views.
  2. The slide number has a slash through it.
  3. The slide will not come in to view during a presentation.

 If you don’t want the hidden slides to print, make sure to remove the checkmark on Print Hidden Slides from the Options button in Print Preview.

Tags: ,

The more you can use the keyboard for getting around or doing tasks in programs or online, the faster you will be.  Also, the same keyboard commands often work in situations where you can’t find the command elsewhere in the program you are using. So get to know some of these shortcuts gradually. Commit to picking out one a day to focus on.  You’ll be amazed at how quickly you remember and use them.

These are the shortcuts I teach in my beginning Word class.

Getting around a document or a page using the keyboard: 

Key

Moves Your Cursor:

HOME Beginning of the line
Ctrl + Home Top of the document
END End (right side) of line
Ctrl + End Bottom of the document
CTRL +  right arrow Word-by word
CTRL + down arrow Moves your cursor down paragraph by paragraph

 Selecting text: 

Select What

Do this:

Select character-by-character Shift  + Right Arrow
Select word-by word Double-click on the word
Select sentence CTRL + click on sentence
Paragraph Triple-click on the paragraph
Select blocks of text.  Click once at your starting point, Shift-click at your ending point. Click at your starting point, SHIFT + Click at ending point
Select Vertical blocks of text Hold ALT key down and drag over text.
Select ALL (the entire document!) Get right-pointed arrow in the left margin and CTRL + Click

Other cool shortcuts:

Task

Do This:

Find words or phrases CTRL + F, Type in word or phrase, click Next
Tab (indent) mid-paragraph line CTRL + Tab
Double space CTRL + 2
Single space CTRL + 1
1.5 Space CTRL + 5
Page Break CTRL + Enter
Switch to other windows Hold ALT key down, press TAB
Undo CTRL + Z
Tags: , ,

There are several types of hyperlinks you can create in PowerPoint for jumping to other slides, websites, or documents. Here is how you can turn a clipart in to a “button” to jump to another slide.

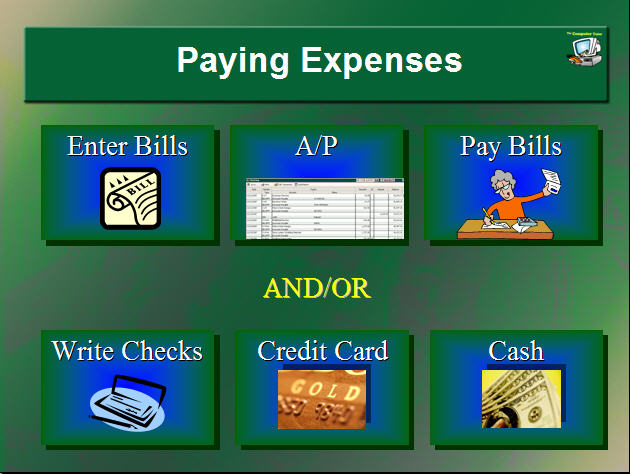
In this example, I have drawn six rectangles on a slide and inserted a clip art on each one. I applied a hyperlink to each clip art to jump to a specific slide on that topic. QBPayingExpenses


To hyperlink a clip art or drawing object: 

  1. Insert the clip art and place as desired on the slide.
  2. Right-click on the clipart > Hyperlink…
  3. Select [Place in this Document].
  4. Select the slide to jump to when you click on that picture.

Now test the hyperlink by going in to SlideShow view > click on the clipart. You should end up on the slide you selected to jump to.

See you in class!

Have you been using Microsoft Word or Excel without formal training – and thinking of taking an intermediate level class?

 The beginning level training covers key foundational concepts you may have missed without training.  Here is a checklist to help you decide if you’re ready for intermediate.  But first, let’s start with your basic Windows knowledge before we take a look at your Word and Excel skills.  Are you able to…

  1. Navigate Windows through icons, folders,  and menus.
  2. Open programs – including Word and Excel.
  3. Use window controls (close, minimize, restore), toolbars, menus, and scroll bars.
  4. Use window views.
  5. Identify which window or program you are in.
  6. Create, save, and name files.
  7. Find and open files you created.
  8. Send a file as an email attachment.

 These are basics a beginner should know using any Microsoft Office program:

  1. How to set margins.
  2. Select text and navigate documents.
  3. Copy and paste.
  4. Spell check.
  5. Change the look of text (change font, make it bold, underlined, or blue).
  6. How to use help.
  7. How to create page breaks.
  8. File > Save, Open, or Close.
  9. Undo.
  10. Print

 Microsoft Word

Specific concepts and features you should know in Word. You can… 

  1. Jump directly from top to bottom of your document without scrolling.
  2. Select words, sentences, paragraphs, lines by methods other than click and drag.
  3. Use the Show/Hide button on the toolbar and know what it is for.
  4. Name two examples of text formats.
  5. Name two examples of paragraph formats. (Formats that apply to paragraphs).
  6. Describe how Word knows what a paragraph is.
  7. Create three types of indents using the ruler.
  8. Describe what AutoCorrect is and what it does.
  9. Double space your text.
  10. Switch between Normal View, Print Layout View, and Print Preview, and know the difference between them.
  11. Turn bullets and numbering on/off.

 EXCEL

You may be ready for Intermediate Excel if you know the following:

  1.  How to widen columns, change row heights.
  2. Design a basic spreadsheet.
  3. The formula bar and its function.
  4. Create basic formulas, to add, average, subtract, divide.
  5. How to automatically fill months of the year across columns.
  6. Move cell contents by drag and drop.
  7. The affect on formulas when copied to other cells.
  8. How to add/remove decimal places.
  9. Format a number as a percent.
  10. Center a spreadsheet on the printed page, and other print settings such as landscape/portrait orientation.
  11. Excel’s pointer modes and what tasks they are for.
  12. AutoSum.
  13. AutoCalculate for a quick total, average, or count without a formula.
  14. How to write a formula with multiple operators (i.e. adding and multiplying in the same formula).
  15. How to add, delete, rename sheets.

If you find yourself unsure about 1/3 of these features, consider taking the beginning class. You will be amazed at how much you learn.

See you in class!

Tags: , , ,

Where should you start when you want to learn Microsoft Office?

As I mentioned in an earlier post to beginners, having clear goals is the best place to start. You should also make sure you have basic Windows skills, which includes knowing how to navigate your computer, adjust settings and preferences, get to the internet, create folders, open programs, and manipulate windows.

 Microsoft Office includes a group of programs for tasking. The core programs include:

Word – Word processing, for creating letters, memos, reports, and book writing.
Excel – For creating spreadsheets, tracking data, mailing lists and other simple data lists, and graphs.
PowerPoint-For creating and displaying presentations, flyers, and handouts. You can also create computer photo albums.
Outlook-For email, calendar, contacts, and task lists.

Other programs may be included, depending on which version of Microsoft Office you have.

In general, the best place to start is with Microsoft Word, since so much of what you learn will carry over to all other programs, as well as on the internet. Many of the tips and tricks you learn in Micosoft Word will also help improve your productivity (make you speedy) and keyboarding.

From there, evaluate what you need. For example, if you are job hunting, watch for what the job posts are asking for.  Outlook is often a good next step, since Outlook is the #1 email and schedule program used by businesses.

Excel is a versatile and popular program, and many jobs require at least a basic knowledge of Excel.  PowerPoint may not be required in many jobs, but it’s one of the easier and fun programs to learn.  In an upcoming post I’ll describe and compare learning Word versus learning PowerPoint.  Stay tuned!

Tags: ,
« Previous posts Next posts » Back to top