Don’t “eyeball” documents or webpages for words you’re looking for.  Save yourself time and do a keyword search.

Find Keywords in a Microsoft Office Document (Word, Excel, PowerPoint)

  1. Home Ribbon > Find & Select (right side of Home tab) > Find.  OR  CTRL + F is the keyboard way to start a Find.
  2. Type the word you’re searching for.
  3. Click on [Find All] for a list of each instance of the word or phrase in your list.
  4. Press [Esc] or click [Close] to clear the dialog box.

Searching a document will check all pages of the document.

 On a website, use the keyboard:   CTRL + F 

Even on a banking website, you can use CTRL +F to search for a check number.

Do you like learning the shortcuts?  Our Microsoft Word Shortcuts “Cheat Sheet” is now available. Click here to learn more.

When going to a website you have the address for, do you just type it in the Google or Yahoo search box?   You are creating more steps and possible confusion for yourself if you are not using the address bar when you have the address.

Address Bar versus Google Search


The address bar is at the top of the window. When you have the address of the website you’re going to, say for example www.Macys.com, go right to it by typing the address in the address bar. (Finish by pressing [Enter].)

You can use a Google or Yahoo search box to get there as well, but it is a SEARCH box that will show you search results first. You will have to locate the link you want in a cluttered screen full of search results.

A Google or Yahoo search box is best used for searching topics – when you don’t know where you need to go to find the information.  For example, say you want to find out about the Academy Awards.  You don’t have a specific address to go to – just a topic you want to search and explore.

In this Google search of Academy Awards 2012, Google finds 27,800,000 “hits” …

Top of a Google Search result indicates the number of results


The blue underlined text is a link to that site.

The green text is the address of the site. It can help you decide if it’s one you want to view.

Want to check several of the results without losing the search page?  Right-click on the link > Open in New Window. The Search results remain open in the previous window.

Want to find an address or a property?  Simply type an address and city in the search box.

Let us know some of your favorite search tips.

Tags: , , ,

What is a Blog?

What is blogging?


Do you subscribe to any blogs?  The word “blog” comes from the term “Web Log.”  You can think of it as an online journal or magazine.  The articles are known as “posts.” 

You may have read blogs without realizing it.  If you search for a topic online and find an article about the topic you searched for – it may have been a blog post.  You can find blogs on about any topic you can think of. You can subscribe to receive all the latest posts.  More on subscribing below.

According to Technorati™ Media, there are 5 types of bloggers:  (From Technorati™ Media “State of the Blogosphere 2011.”, an annual study.)

1) Hobbyist: 60% of the respondents to this survey are Hobbyists, saying they “blog for fun” and do not report any income. Half of hobbyists prefer to express their “personal musings” when blogging. 60% indicate they spend less than three hours a week blogging, yet half of hobbyists respond individually to comments from readers. Because 72% blog to speak their minds, their main success metric is personal satisfaction (61%).

2-3) Professional Part- and Full-Timers: 18% of the total group. They are independent bloggers who either use blogging as a way to supplement their income, or consider it their full-time job. Most of these professional bloggers don’t consider blogging their primary source of income. This group primarily blogs about personal musings and technology

4) Corporate: Corporate bloggers make up 8% of the blogosphere. They blog as part of their full-time job or blog full-time for a company or organization they work for. These bloggers primarily talk about technology and business in their blogs. 70% blog to share expertise, 61% to gain professional recognition, and 52% to attract new clients. They have found that blogging has given them greater visibility in their industry (64%) and company (63%). 63% of corporate bloggers use their number of unique visitors to measure success.

5) Entrepreneurs: 13% of the blogosphere is characterized as entrepreneurs, or individuals blogging for a company or organization they own. 84% of these bloggers blog primarily about the industry they work in, with 46% blogging about business and 40% about technology. 76% blog to share expertise; 70% blog to gain professional recognition; and 68% to attract new clients for their business

Subscribe to The Computer Tutor Blog!

Our posts are tips and how-to articles for average computer users. If you haven’t visited our blog, here is a link:

http://www.computertutornews.com/computer-tipsarticles/

If you scroll down – on the right you will find links that break down the articles by topic (example: Excel articles).   

To Subscribe (which means you will receive a new post in your Inbox when new articles are posted) click on the RSS Feed button, an orange button in the upper-right corner of the site that looks like this:

RSS Feed Icon

Click on RSS Feed button to subscribe to a blog


A very common scenario in Excel is creating spreadsheets that report numbers for specific time periods. For example, weekly, monthly, quarterly, or annual reports.  This means you will continually be re-creating the same spreadsheet going forward in time – other than the variance in reported data.

You don’t want to start from scratch. Make quick work of your next report – duplicate the sheet, then edit the details. 

Some of you might be asking “Does she mean copy-and-paste?”  NO!  Though it can be accomplished by copying the info from the previous spreadsheet to a new blank sheet, it will take more work than the duplication method because there are several things that do not come over with the copy-and-paste, including:

  • Widened columns.
  • Changed row heights.
  • Print settings, including headers and footers.

To duplicate a sheet:

  1. Drag the sheet tab to the right while holding the CTRL key down.
  2. When you see a little black triangle appearing on the right side of the sheet tab, release your mouse before releasing the CTRL key.  The new worksheet will be named the same with a (2) after it. Example: A duplicated March sheet will be March (2). 
  3. Now edit the details of the duplicate sheet.  Change the sheet name, edit time period labels, input your new data.

Quick and easy you are done with your report and leaving your office early! (Until the boss decides they need to give you more work 🙂

Tags: , ,

One of QuickBooks’ useful reports is the Open Invoice report (Reports > Customers & Receivables > Open Invoices) to help you stay on top of money owed to you.  The report lists customer unpaid invoices.  Have you ever used this report and found a customer listed with a zero balance?  Why is it showing up on the Open Invoice report?  (See illustration below). 

QuickBooks Open Invoice Report with Zero Balance

QuickBooks Open Invoice with Zero Balance

 When entering a customer payment, the default in QuickBooks (in Edit > Preferences > Sales & Customers) is to Automatically apply payments. This means that when you enter the upper part of the payment window, QuickBooks will automatically checkmark a matching or older payment due in the payment window.

QuickBooks Preference: Automatically Apply Payment

If you turn off this feature, QuickBooks does not enter a checkmark against open invoices. The user must do it.

Why would someone want to turn that off?  QuickBooks sometimes applies the payment in the wrong place. It “guesses” which invoice to apply the current payment to. If the user is not paying attention, the payment can get applied to the wrong open invoice.  This is potentially a problem for businesses that have multiple open invoices for any one customer.

By removing the checkmark for “Automatically apply payments,” the user must proactively place a checkmark next to the invoice the payment is intended for.

Occasionally the user may forget to checkmark the invoice being paid by the payment. In a simple scenario of one payment paying one single invoice, the result will be the payment is noted for the customer, but is not specifically applied to an invoice. Resulting in a zero balance for the customer, but the invoice is still considered “open.”

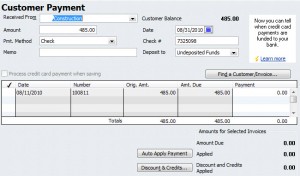
The illustration below shows a Payment that was entered, but notice there is no checkmark in the first column, which would apply it to that invoice. The customer gets “credited” for the payment, but the invoice is not cleared. 

QuickBooks Customer Payment Window

Place a Checkmark in the First Column to Apply to Invoice

Fixing this is easy. Simply open the payment, and place the checkmark next to the invoice it pays in the lower part of the payment window. Now when you run Open Invoices, the invoice should no longer be in the report.

Tags: , ,

As a computer trainer, I work with people at all levels when it comes to computer skills.  Whether I am working one-to-one, or in a classroom situation, I ask questions about a student’s experience and goals to help me create a custom training plan.

I also make “quiet” observations that help me quickly assess how well-trained (or not) people are. It is not a judgment of how smart someone is, simply a tool to give me a starting point for helping my clients.

Co-workers or others may be more judgmental about some of the same indicators I use. That gave me the idea to write a post about it. See if any of these apply to you:

  1. You have no idea which operating system you’re using on your own personal computer.
  2. You do not know the difference between a right click and left click, or have trouble moving your pointer when you reach the edge of the mouse pad.
  3. You turn off your computer by simply pressing the power button.
  4. You do not know the difference between “Windows” and “Office.”
  5. When using the internet, you do not know the difference between the address bar and the search bar.
  6. You do not know what it means to minimize or maximize a window.
  7. You think you must close your current program in order to open something else.
  8. You use your email program as your permanent storage place for files and pictures you’ve received by email.
  9. You are unaware that you can scroll down on a website to see more of the page.
  10. You are clueless when asked to go to your documents or pictures folder.

I know many of my readers are NOT this basic – and may even be giggling at some of these. If you’re not giggling – if you’re tired of being a “computer dummy,”  give us a call to schedule training.

Not ready for one-to-one training? The Computer Tutor offers easy-to-follow courseware that we use in our classroom. Many students ask me about the “Dummies®” series. Those books are fine, but we recommend the series called “Teach Yourself Visually.” Most people are visual learners and these books (they offer several topics) are packed full of color illustrations, rather than words, words, words.

Click here to see the Teach Yourself Visually for Microsoft Windows 10.

I’ll provide the answers to these in future posts. Stay tuned!

When your Excel file exceeds the screen view, and you scroll down or to the right in order to view your data, the row and/or column labels also scroll away from view.  Data becomes meaningless when you can’t see what it belongs to. 

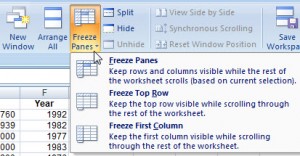
Freeze Panes allows you to “freeze” the row/column labels (for example, “Jan, Feb, Mar, Total”) in view so they continue to show on screen even as you scroll down through document.  Freeze Panes does not affect printing (we’ll cover print-related issues later).

Where you click before you “freeze” is important. Excel will freeze above and to the left of where your cell selection is.  For example, if all you need to freeze is your top row of labels on row 1, click on cell A2 when you Freeze Panes.  If you also need the A column to stay in view when you scroll to the right in a wide spreadsheet, click on cell B2.

            To turn on Freeze Panes:   View  >  Freeze Panes. Choose rows or columns or both.

            To turn off Freeze Panes:  View  >  Unfreeze Panes


[print_link]

Tags:

Social Media may not be for everyone, but when I hear someone say “I don’t care what people had for breakfast!” I can’t help but think they don’t have the full picture.  So here’s my list of ways that Social Media sites (such as Facebook, LinkedIn, Twitter, Instagram, and YouTube) enhance the day-to-day lives of people who love it. And I couldn’t keep it to 10 – had to go with 11!   I’ll top off the list with some cautionary tips.

  1. Stay connected with distant (and busy!) family without long-distance and time-consuming phone calls (and playing phone tag).
  2. Reconnect with friends from your past without having to attend your reunion. Most social sites have tools to help you do this.
  3. Get instant updates from school mom networks when emergencies arise at your children’s school.
  4. Career connections –Your former supervisor could be the connection to your next job!
    Be found (or ‘found out’ !) as a potential candidate by companies searching for employees on social sites such as LinkedIn.
  5. Own a business? Establish relationships and credibility – more cost-effective than traditional advertising, great potential for reaching YOUR target market.  It’s a great way to develop relationships  over time – a long term strategy.
  6. Causes-Keep up with causes you care about but don’t have a lot of time for. From political, social, and legal causes to conservation, fundraising, and awareness.
  7. Support, Fellowship,and Information:  Find groups in the socialsphere that help you feel like you’re not alone.  Moms, book writers, divorcees, veterans, dieters, medical issues of every kind, accident victims, crime victims, addicts (but remember the public nature of social), job seekers, travelers, musicians, entrepreneurs, hobbyists – just to mention a few!
  8. Learning-There is so much out there to learn – and so much of it is free. Find lectures and webinars on topics of interest to you.
  9. Know the new. “Listen” to what people are saying about trending topics that are “now.”
  10. Entertainment-Games, pictures, videos, stories – some of it is just pure entertainment!
  11. Ask a question – get 50 responses!

CAUTION – 4 things you NEVER want to do on social media

Do NOT ignore your Privacy settings – know where they are and how to remove yourself from a site if you need to.

Do NOT send money to someone who has contacted you through a social site – even a “friend” – without speaking to them by telephone or some other method outside of the site where they contacted you.

Do NOT post anything you don’t want to be public knowledge.  What you post is public and can be viewed by insurance companies, law enforcement, judges, and prospective employers. Not to mention your mom.  😉

Do NOT assume that news posts are true. Plenty of fake online news stories lure people in with sensational headlines in order to drive traffic to underhanded web marketers.  Consider the source. Is it from NewYorkTimes.com or SomeWeirdName.com?

Let us know how Social Media makes YOUR life better!

Tags: ,

Column Tip

Need a simple column look without the hassle of column formatting?  Create a table with the number of columns and rows you need, hide the lines of the table, and you have a column look without the hassles of Word’s column feature.

 Click on Table on the Insert Ribbon (Word 2007).

  1. Highlight the number of columns and rows you want. Hold your mouse button down and drag if you need more columns or rows than showing on the grid. The illustration below will give me three columns and three rows.
  2. Type your content and size the columns and rows as needed.
  3. Hide table lines:  Select the table. Make sure the Table Tools Design Ribbon comes in to view. If it doesn’t, try double-clicking on the table selector.
  4. Select No Borders from the Borders drop-down box.

Note:  the table may appear on screen to have light blue dotted lines still – but they will not print.

Insert a Word table. 


Like knowing the shortcuts?  Our Microsoft Word Shortcuts “Cheat Sheet” is now available. Click here  for more information.

Tags: , ,

If you would like to figure out what a loan payment will be, use Excel’s PMT function.

=PMT(rate,nper,pv,fv,type)

Rate = Interest rate for the loan. Because the interest rate is per annum, you must divide it by 12.
Nper=Number of payments, expressed in years x 12.
Pv=Present Value, otherwise known as the principal or loan amount
Fv=future value, or a cash balance you want to attain after the last payment is made. If fv is omitted, it is assumed to be 0 (zero), that is, the future value of a loan is 0.
Type = (Optional) When payments are due. (Zero or omitted=end of period, 1 is at beginning of period).

The following is an example of a mortgage loan payment calculation:

The function typed in to cell B7 in this illustration is =PMT(B5/12,B6*12,B4).  B5 is the interest rate, which must be divided by 12 because it is an annual rate. B6 is the loan term, which must be multiplied by 12 for the 12 payments per year. B4 is the loan amount. In this example, there is no need to include Future Value or Type. 

Note:  There is also a PPMT function.  PPMT returns the principal portion of a specific loan payment; where PMT returns the full, fixed payment for a loan.

Tags: ,

Do you get tired of re-typing the same paragraphs or specially formatted text in your documents on a regular basis?  Or maybe you have tried to solve that issue by opening previous documents to copy and paste text to your new document.  No need to do that when you can “memorize” text passages with Word 2007/2010 Quick Parts. 

Quick Parts allows you to create reusable formatted text, even tables, which you can insert instantly without recreating every time you need it. 

A good example is the closing paragraph and signature in a letter. If your letter closing and signature is always the same, don’t re-type it or copy-and-paste it each time. Create and use it as a Quick Part!

Here is how you create your custom Quick Part.  In this example I will do a closing paragraph and signature area.  You only have to do this once, unless it changes.

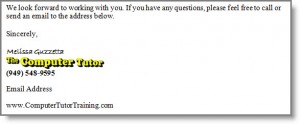
  1. Create the text in a Word document as you want it to appear in your documents. (Or you can open one that already exists). In the following example of a letter closing I have even used a picture logo.Microsoft Word Quick Parts Example
  2. 2. Select the full passage you want included. In my example above, I will select from “We look forward… down to (and including) my website address.

3.  Insert > Quick Parts > Save Selection to Quick Part Gallery.

4.  Word will suggest a name for the Quick Part, but you can edit the name.

5.  Word will save it in the General category of Quick Parts. However, you can create a new category of Quick Parts by clicking on Create New Category from the drop-down. Category examples:  LetterClose, or Disclaimers

To use your Quick Part in future documents: 

  1. Click at the spot where you want to insert the text.
  2. Insert Ribbon > Quick Parts > select your Quick Part from the list.

You should now see your entire closing and signature line! Every time you need to use the text – that’s all you have to do.  Saves a lot of typing! 

Another component of Quick Parts is the Building Blocks Organizer (I’ll call it the BBO).  The BBO includes a list of built-in “document parts” you can use for instantly professional looking documents.  Examples of document parts include cover pages, headers/footers, tables, text boxes, and more.  A great way to check out how you might use the BBO is to explore it, try some out.  Insert > Quick Parts > Building Blocks Organizer…

There are so many cool features to help make your work fast and easy in Microsoft Word. Stay tuned for more time-saver tips!

Like knowing the shortcuts?  Our Microsoft Word Shortcuts “Cheat Sheet” is now available. Click here  for more information.

Getting good training is the single most important thing you can do increase your computer productivity.  That’s where we can help!  Sign up for our email list on our home page and give us a call today.

Tags: , , , , , , , ,

Stop Unwanted Startup Windows

Have you ever had a new window begin appearing every time you start your computer and find yourself asking “Where did that come from?”

This can occur after you have installed a new program, or when your computer has installed a Windows update.

In this illustration, a Windows Live Messenger sign-in screen began to appear every time I started my computer. This occurred after a Windows Update.

DesktopWithPopup

True, I could just close the window each time, but there is no need to do that if I remove it from my startup configuration. I could also close down the icon on my Task Bar by right-clicking and selecting [Exit]. But the program will appear again next time I start the computer.

SYSTRAY
The visual indicator of the programs opening and running in the background on your computer is an area called the Systray, which is where your computer clock is (lower-right corner of your screen).

Several of these programs need to be running, such as the sound, your computer network, your anti-virus software, and perhaps some programs that you use regularly. But the more icons you have in this area:

1. The longer your computer start-up takes.
2. More memory resources are being used by your computer for those programs running in the background.

You have the option of removing these programs from the Start-Up without removing them from your computer.

In this demonstration, I’m on a Windows Vista computer, though the process works similarly with Windows 7.

1.  Click the Start button (lowerleft) and type “run.”  This will find a program called RUN. Click on that.

2.  Type msconfig, press [Enter].

3.  In Windows Vista, you may be asked permission to continue. Click [Continue].

4.  In the System Configuration dialog box, click the Startup tab.
      You will see a list of checkboxes and programs running in the background.
      The Startup Item column can be widened if it’s difficult to see the program name.

5.  Remove the checkmark from the program you want to disable from Startup.  Sometimes it can be difficult to identify which program that is. The command column can sometimes provide some clues.

In this illustration, I want to remove the checkmark from Windows Live Messenger.

StartupPrograms

You may need to restart your computer. If you are ready to restart, click that button. Otherwise, you can [Exit without restart] to continue working with your computer and restart your computer later. 

After going through these steps, the Windows Live Messenger window no longer opens automatically on my computer. However, the program is still on my computer, so I can open it when I need it.

Tags: ,
« Previous posts Back to top