Archive for 'Microsoft Word'

Don’t “eyeball” documents or webpages for words you’re looking for.  Save yourself time and do a keyword search.

Find Keywords in a Microsoft Office Document (Word, Excel, PowerPoint)

  1. Home Ribbon > Find & Select (right side of Home tab) > Find.  OR  CTRL + F is the keyboard way to start a Find.
  2. Type the word you’re searching for.
  3. Click on [Find All] for a list of each instance of the word or phrase in your list.
  4. Press [Esc] or click [Close] to clear the dialog box.

Searching a document will check all pages of the document.

 On a website, use the keyboard:   CTRL + F 

Even on a banking website, you can use CTRL +F to search for a check number.

Do you like learning the shortcuts?  Our Microsoft Word Shortcuts “Cheat Sheet” is now available. Click here to learn more.

Column Tip

Need a simple column look without the hassle of column formatting?  Create a table with the number of columns and rows you need, hide the lines of the table, and you have a column look without the hassles of Word’s column feature.

 Click on Table on the Insert Ribbon (Word 2007).

  1. Highlight the number of columns and rows you want. Hold your mouse button down and drag if you need more columns or rows than showing on the grid. The illustration below will give me three columns and three rows.
  2. Type your content and size the columns and rows as needed.
  3. Hide table lines:  Select the table. Make sure the Table Tools Design Ribbon comes in to view. If it doesn’t, try double-clicking on the table selector.
  4. Select No Borders from the Borders drop-down box.

Note:  the table may appear on screen to have light blue dotted lines still – but they will not print.

Insert a Word table. 


Like knowing the shortcuts?  Our Microsoft Word Shortcuts “Cheat Sheet” is now available. Click here  for more information.

Tags: , ,

Do you get tired of re-typing the same paragraphs or specially formatted text in your documents on a regular basis?  Or maybe you have tried to solve that issue by opening previous documents to copy and paste text to your new document.  No need to do that when you can “memorize” text passages with Word 2007/2010 Quick Parts. 

Quick Parts allows you to create reusable formatted text, even tables, which you can insert instantly without recreating every time you need it. 

A good example is the closing paragraph and signature in a letter. If your letter closing and signature is always the same, don’t re-type it or copy-and-paste it each time. Create and use it as a Quick Part!

Here is how you create your custom Quick Part.  In this example I will do a closing paragraph and signature area.  You only have to do this once, unless it changes.

  1. Create the text in a Word document as you want it to appear in your documents. (Or you can open one that already exists). In the following example of a letter closing I have even used a picture logo.Microsoft Word Quick Parts Example
  2. 2. Select the full passage you want included. In my example above, I will select from “We look forward… down to (and including) my website address.

3.  Insert > Quick Parts > Save Selection to Quick Part Gallery.

4.  Word will suggest a name for the Quick Part, but you can edit the name.

5.  Word will save it in the General category of Quick Parts. However, you can create a new category of Quick Parts by clicking on Create New Category from the drop-down. Category examples:  LetterClose, or Disclaimers

To use your Quick Part in future documents: 

  1. Click at the spot where you want to insert the text.
  2. Insert Ribbon > Quick Parts > select your Quick Part from the list.

You should now see your entire closing and signature line! Every time you need to use the text – that’s all you have to do.  Saves a lot of typing! 

Another component of Quick Parts is the Building Blocks Organizer (I’ll call it the BBO).  The BBO includes a list of built-in “document parts” you can use for instantly professional looking documents.  Examples of document parts include cover pages, headers/footers, tables, text boxes, and more.  A great way to check out how you might use the BBO is to explore it, try some out.  Insert > Quick Parts > Building Blocks Organizer…

There are so many cool features to help make your work fast and easy in Microsoft Word. Stay tuned for more time-saver tips!

Like knowing the shortcuts?  Our Microsoft Word Shortcuts “Cheat Sheet” is now available. Click here  for more information.

Getting good training is the single most important thing you can do increase your computer productivity.  That’s where we can help!  Sign up for our email list on our home page and give us a call today.

Tags: , , , , , , , ,

Cut/Copy and Paste are computing essentials, giving you the ability to edit quickly and easily. Because it is such a basic yet important skill, many of you already know the drill. However, many of my readers are still learning the basics, so this is for those of you unsure of your Cut/Copy/Paste skills.

Difference between Cut versus Copy

CUT and paste removes text or objects from the original location to move it elsewhere.
COPY and paste leaves the original in place while you copy it to another location.

There are 5 Methods for Cut/Copy/Paste. We’ll use Microsoft Word 2007 as our program example here, but the keyboard and right-click methods can be used in any program.

1. Keyboard
2. Right-Click
3. Ribbon (toolbar)
4 “Drag ‘N Drop”
5. Quick Access Toolbar can be customized to include Cut/Copy/Paste. (Next to Office Button in upper-left corner of screen, must be customized first)

4 out of the 5 COPY or CUT actions happen in four steps. What varies is the command method.

1. Highlight the text you are copying or moving.
2. Activate COPY or CUT command
3. Place cursor where you want to place the text.
4. Issue PASTE command.

Here are the specifics for each method. Try them to see which one you prefer. Remember to highlight the text first.

1. Keyboard Method: CTRL + C to copy; CTRL + X to cut; CTRL + V to Paste

2. Right-click method: Right-click > Copy or Cut; Right-click > Paste

3. Ribbon Method – on left side of the Home Ribbon
Click Copy button or Cut button (scissors). Click at your destination, then click Paste button (clipboard button at far left of Home Ribbon).

4. Drag-and-drop: Highlight text to copy or move. To move: Point at the highlighted text, use the mouse to “drag” the highlighted area to your destination.
To copy: Hold CTRL key down while you drag

5. Quick Access Toolbar Method
Copy and Paste commands must be added to the toolbar first by clicking on the customize drop-down arrow

Some examples of places to use Cut/Copy/Paste: Email, Internet, Windows, Excel, Photo editing… and much more!

Like knowing the shortcuts?  Our Microsoft Word Shortcuts “Cheat Sheet” is now available. Click here  for more information.

Tags: , ,

By what I often hear from people or see posted online, Microsoft Word seems to be the most hated of the Microsoft Office programs, and I think I know why. In many cases, it boils down to a lack of, or poor training.  Not that Word is perfect – no program is.  But let’s take a look at the big picture.

Word is a word processor, with features designed around formatting words on a page organized in to sentences, paragraphs, pages, and sections. So it’s used for reports, letters, memos, books, handouts, invitations, flyers, and more.  It’s all about text editing.

Because text editing occurs in almost any other program you use, including email and internet, much of what you learn carries over to everything you do on the computer. So Word is a great place to start with your training. You even learn to use the keyboard more effectively.

I’ve noticed that Word haters who never got training (or inadequate training) don’t understand that Word has four levels of formatting. Even when I started my training career, I never saw it taught this way, but after a few years of using and teaching Word myself – it occurred to me that understanding this concept tends to clear up a lot of confusion.

Word’s four levels of formatting:

Character formatting
This is usually the level that people with minimal training “get”.  The problem is there’s an assumption that everything else works the same way. This is why they may have trouble formatting their document.

Character formats apply at the text character level – letter-by-letter.  Examples :  fonts, font size, font color, bold, italics, underline. You select the text and apply the format.
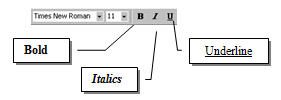
Microsoft Word Character Formats

Microsoft Word Character Formats


Paragraph formatting
Paragraph formatting applies to whole paragraphs.  Paragraph formatting is key – so it is important to understand how Word recognizes a paragraph (I’ll get to that later).  Examples of paragraph formatting include

Indents, line spacing, paragraph spacing, alignment, bullets and numbering, tabs, and heading controls.

If applying to a single paragraph, you click ANYWHERE in the paragraph to apply the paragraph format.  If applying to multiple paragraphs, you must select all of the paragraphs.

Understanding this level of formatting is HUGE.  For example, you can create any type of indent to as many paragraphs as you like when you learn how to use the ruler to work with paragraphs. Many other intermediate to advanced features that help you automate your document depend on well-defined paragraphs and text relationships.  Examples:  Styles, Table of Contents, Outlines.

Page/section/document formatting
Applies to whole pages, sections, or the entire document.. Sections can be defined in order to have multiple page layouts that would normally apply to the entire document.

Examples of page/section/document formatting:  margins, page orientation, headers and footers, page numbering, page borders, columns.

These formats will automatically apply to the entire document unless you define sections (covered in intermediate or advanced Word). When you have sections, you apply formats to sections through the appropriate dialog box (depending on the format you are applying).

 Object formatting
Objects are things you insert to your document that “float” on the page. Objects have their own formatting dialog box, which you can access by double-clicking on the object.

Examples of objects:  pictures, clipart, text boxes, arrows, AutoShapes, WordArt.

Examples of object formatting:  line or no line (around edge), color, shadow effects, size.

How Does Word Know What a Paragraph Is? 

Any place in the document you press [ENTER].

 Each time you press the [Enter] key on the keyboard, a non-printing paragraph character like this: ¶  is entered on your document, marking all text between there and the previous paragraph mark as a paragraph. In a future post, I will talk about non-printing characters.

 There is a lot more to learn about Microsoft Word, but I hope this information makes your Word learning experience go a little easier!

Our 2-sided, laminated Word Shortcuts “Cheat Sheet” is a handy card you can keep by your computer as a quick reference for shortcuts in Word.  Click the following link to order your copy:

http://www.computertutornews.com/store/

Melissa Guzzetta
The Computer Tutor
Computer Training and more 


Tags: ,

The more you can use the keyboard for getting around or doing tasks in programs or online, the faster you will be.  Also, the same keyboard commands often work in situations where you can’t find the command elsewhere in the program you are using. So get to know some of these shortcuts gradually. Commit to picking out one a day to focus on.  You’ll be amazed at how quickly you remember and use them.

These are the shortcuts I teach in my beginning Word class.

Getting around a document or a page using the keyboard: 

Key

Moves Your Cursor:

HOME Beginning of the line
Ctrl + Home Top of the document
END End (right side) of line
Ctrl + End Bottom of the document
CTRL +  right arrow Word-by word
CTRL + down arrow Moves your cursor down paragraph by paragraph

 Selecting text: 

Select What

Do this:

Select character-by-character Shift  + Right Arrow
Select word-by word Double-click on the word
Select sentence CTRL + click on sentence
Paragraph Triple-click on the paragraph
Select blocks of text.  Click once at your starting point, Shift-click at your ending point. Click at your starting point, SHIFT + Click at ending point
Select Vertical blocks of text Hold ALT key down and drag over text.
Select ALL (the entire document!) Get right-pointed arrow in the left margin and CTRL + Click

Other cool shortcuts:

Task

Do This:

Find words or phrases CTRL + F, Type in word or phrase, click Next
Tab (indent) mid-paragraph line CTRL + Tab
Double space CTRL + 2
Single space CTRL + 1
1.5 Space CTRL + 5
Page Break CTRL + Enter
Switch to other windows Hold ALT key down, press TAB
Undo CTRL + Z
Tags: , ,

Have you been using Microsoft Word or Excel without formal training – and thinking of taking an intermediate level class?

 The beginning level training covers key foundational concepts you may have missed without training.  Here is a checklist to help you decide if you’re ready for intermediate.  But first, let’s start with your basic Windows knowledge before we take a look at your Word and Excel skills.  Are you able to…

  1. Navigate Windows through icons, folders,  and menus.
  2. Open programs – including Word and Excel.
  3. Use window controls (close, minimize, restore), toolbars, menus, and scroll bars.
  4. Use window views.
  5. Identify which window or program you are in.
  6. Create, save, and name files.
  7. Find and open files you created.
  8. Send a file as an email attachment.

 These are basics a beginner should know using any Microsoft Office program:

  1. How to set margins.
  2. Select text and navigate documents.
  3. Copy and paste.
  4. Spell check.
  5. Change the look of text (change font, make it bold, underlined, or blue).
  6. How to use help.
  7. How to create page breaks.
  8. File > Save, Open, or Close.
  9. Undo.
  10. Print

 Microsoft Word

Specific concepts and features you should know in Word. You can… 

  1. Jump directly from top to bottom of your document without scrolling.
  2. Select words, sentences, paragraphs, lines by methods other than click and drag.
  3. Use the Show/Hide button on the toolbar and know what it is for.
  4. Name two examples of text formats.
  5. Name two examples of paragraph formats. (Formats that apply to paragraphs).
  6. Describe how Word knows what a paragraph is.
  7. Create three types of indents using the ruler.
  8. Describe what AutoCorrect is and what it does.
  9. Double space your text.
  10. Switch between Normal View, Print Layout View, and Print Preview, and know the difference between them.
  11. Turn bullets and numbering on/off.

 EXCEL

You may be ready for Intermediate Excel if you know the following:

  1.  How to widen columns, change row heights.
  2. Design a basic spreadsheet.
  3. The formula bar and its function.
  4. Create basic formulas, to add, average, subtract, divide.
  5. How to automatically fill months of the year across columns.
  6. Move cell contents by drag and drop.
  7. The affect on formulas when copied to other cells.
  8. How to add/remove decimal places.
  9. Format a number as a percent.
  10. Center a spreadsheet on the printed page, and other print settings such as landscape/portrait orientation.
  11. Excel’s pointer modes and what tasks they are for.
  12. AutoSum.
  13. AutoCalculate for a quick total, average, or count without a formula.
  14. How to write a formula with multiple operators (i.e. adding and multiplying in the same formula).
  15. How to add, delete, rename sheets.

If you find yourself unsure about 1/3 of these features, consider taking the beginning class. You will be amazed at how much you learn.

See you in class!

Tags: , , ,

Have you ever struggled to find just the right word(s) in your
PowerPoint presentation or Word document – and then wondered where
that dusty old thesaurus is?

You can bring up a thesaurus on-the-spot in Word and PowerPoint.
Simply right-click on your existing word and select synonyms> for a
submenu of similar words you can choose from to replace what you have.

Cool beans! (Or chilly legumes, as my thesaurus would say).

Tags: ,
Back to top